Windows: FreeNAS Embedded Installation
FreeNAS is available for download in two forms .ISO and .IMG. If all you want to do is try FreeNAS and possibly install then you should download the ISO. The .IMG is intended for embedded installs like the kind of install you do in USB flash drive or compact flash card. The thing about the embedded install is that unlike the .ISO the .IMG file includes no installer. Instead the user is expected to make use of third party tools to complete the installation. Before we can start the tutorial you will need the following:
- FreeNAS .IMG (61MB file)
- USB Flash drive or Compact Flash card larger than the .IMG file
- physdiskwrite (3rd party tool), this is what will write the image
Nix* users have DD to write images, in the case of Windows the closest tool available is physdiskwrite. With physdiskwrite we can write the raw image to the storage media. Physdiskwrite is a command line tool, I will try my best to guide you trugh the commands. At the time of this tutorial the latest release for i386 is FreeNAS-i386-embedded-0.7.2.5543.img. I will break the tutorial in to two parts:
- We will use Diskpart a windows tools that in this case will help us clean the storage media. Not performing this steps may perform in errors
- Write the image with the help of Physdiskwrite
Working With Diskpart
I recommend following the Diskpart steps below to avoid errors that may come up when writing the image. The steps below will clear the drive you intend to use for the installation. Open a command line window and type: Diskpart  Now list of all available drives: list disk
 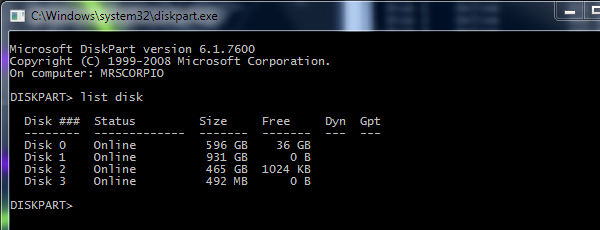 The USB drive intend to use for the installation is listed as disk 3, select it: select disk 3
  And clean it by typing: clean
  Once the process is complete type: exit
Write The Image With Physdiskwrite
For the sake of simplicity I recommend placing both Physdiskwrite.exe and FreeNAS-i386-embedded-x.x.x.xxxx.img in the same folder. Open the command line and CD(move) to the location where the Physdiskwrite and the .img file are located. Type the command below to find the drive:
C:UsersLuisDocumentsIMG>physdiskwrite.exe -u FreeNAS-i386-embedded-0.7.2.554.img
3.img
physdiskwrite v0.5.2 by Manuel Kasper Searching for physical drives…
Information for .PhysicalDrive0:
Windows: cyl: 77825
tpc: 255
spt: 63
C/H/S: 16383/16/63
Model: WDC WD6401AALS-00J7B1
Serial number: WD-WMATV3658664
Firmware rev.: 05.00K05
Information for .PhysicalDrive1:
Windows: cyl: 121601
tpc: 255
spt: 63
C/H/S: 16383/16/63
Model: WDC WD10EALS-00Z8A0
Serial number: WD-WCATR0751123
Firmware rev.: 05.01D05
Information for .PhysicalDrive2:
Windows: cyl: 60801
tpc: 255
spt: 63
C/H/S: 16383/16/63
Model: WDC WD5001AALS-00L3B2
Serial number: WD-WMASZ0056513
Firmware rev.: 01.03B01
Information for .PhysicalDrive3:
Windows: cyl: 62
tpc: 255
spt: 63
The output above tells us that PhysicalDrive3 is the removable drive. Which is why we select drive number 3 to write the image to.
Which disk do you want to write? (0..3) 3
Confirm you want to overwrite by typing Y.
About to overwrite the contents of disk 3 with new data. Proceed? (y/n) y
Found compressed image file
75350016/75350016 bytes written in total
Once the process is done close the terminal window. The image is now in the Flash drive.
Other Steps
Keep in mind that in order to boot from a Flash drive you need to set the BIOS to boot from removable media. 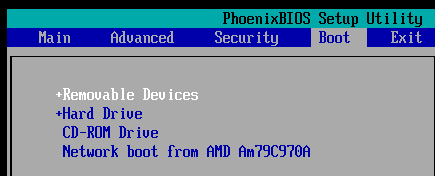
NAS, freebsd, freenas — Jan 23, 2011