Monitor network latency with SmokePing
If you have ever manage network devices over long distance or even in a local area network you might want to keep an eye on the health of the network and the links they operate on. That’s a very good reason for using SmokePing on the network, SmokePing can graph over time the latency experienced by the probe. In the long run network monitoring can help identify trouble points or areas of interest. If you are paying for a T1 then you should get your moneys worth. There is nothing worse than having little or no data to troubleshoot network problems.
SmokePing overview
SmokePing generates graphs over time that show vital network information about the quality of the selected link being monitored by the probe. SmokePing can be easily configured to monitor multiple sites at the same time and show the specific time in which the link experienced unusual activity. It’s common knowledge that high latency will result on poor network performance. Prior to the installation you should have a full functional web server installed.
Examples
- Monitor the latency of the OpenDNS servers and make an informed decision on whether they are or not in your best interest.
- Monitor links from the central office to the remote office. Constant and unusual high levels of latency may indicate a problem with the ISP.
- Servers become unreachable during certain periods of the day. With the data log by the probe you can pin point the time of failure (disconnection).
SmokePing installation on Ubuntu
SmokePing is available in the Ubuntu repositories. For Debian based Distributions you can use Apt-Get, installation may depend on you distribution.
sudo apt-get install smokeping
SmokePing configuration
The configuration file is located at /etc/smokeping/config. The configuration file I am using is organised to monitor two separate sites with multiple hosts. In real life this examples would represent the local site and the remote site. Copy of SmokePing configuration file. Open and edit.
sudo nano /etc/smokeping/config
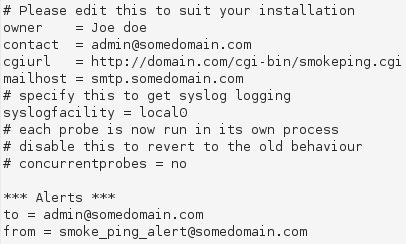
To get SmokePing started let’s edit some of the basic options. I hope this is somewhat self explanatory, change the following values to match your server values.
- owner and contact
- cgiurl
- mailhost
- to
- from
 Remember what I said about monitoring two separate sites, well one is the local area network (NETWORK1) and the other monitors colocated servers (NETWORK2). You can see the hierarchy “+++” represents the target host. Make changes as you see fit. In this case I am monitoring three network devices. Change the hostname to match your own, enter the IP address or domain name of the devices.
- ++ NETWORK1 (Name of the network)
- +++ LAN_ROUTER (Target host)
 Same can be said about the second example (NETWORK2), again three network devices are being monitored.
 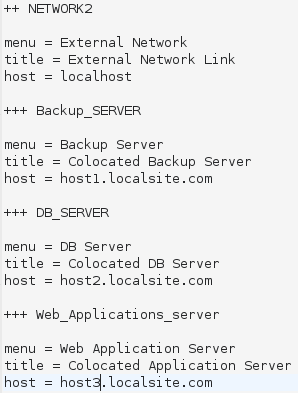 After you are done with the changes save and restart SmokePing.
/etc/init.d/smokeping restart
Open your browser and go to the following address.
http://www.domain.com/cgi-bin/smokeping.cgi
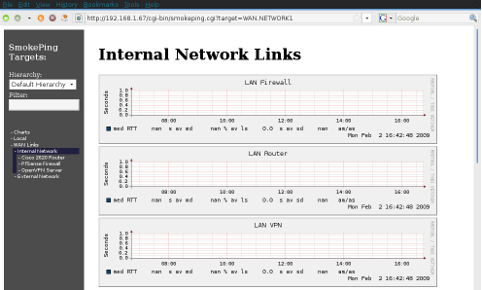 Give SmokePing some time to log the data. Try to experiment with the configuration file, but all try to keep the target host’s organized.
References
SmokePing examples.en.html SmokePing web site
network, smokeping — Feb 4, 2009